***The following integration only works with QuickBooks Desktop 2021 and earlier versions. QuickBooks removed the Timer Activities import feature in 2022.***
What are the requirements for QuickBooks integration?
This help resource explains QuickBooks integration for the desktop version of QuickBooks. We also integrate with QuickBooks online. The help resource for QuickBooks online integration is available here.
For the desktop version, QuickBooks 2006 or newer for Windows is required for Quickbooks online integration.
QuickBooks Mac and Quickbooks Online are not supported because they do not allow time activity to be imported.
How does data get from Intervals into QuickBooks?
Intervals exports time data as IIF files for importing into the QuickBooks QBTimer. Follow the instructions below and fill out the form on the left to set up QuickBooks and your Intervals account. Once the setup is complete you will see the QuickBooks export icon ![]() appear to administrator level users on the following pages:
appear to administrator level users on the following pages:
- Timesheet
- Edit Time
- Summary Report
- Project Activity Report
How do I set up QuickBooks?
First, you will need to make sure that you have QBTimer installed in QuickBooks (it is not installed by default). If you don’t, follow these steps to install it and get QuickBooks set up for importing time from IIF files.
- Load the QuickBooks CD on the computer
- Browse to the CD and open the QBTimer folder
- Run the install.exe file
- Follow the onscreen instructions
How do I set up Intervals?
Now that you’ve set up QuickBooks, follow these steps to extract the COMPANYCREATETIME variable from QuickBooks (Intervals will need this value to properly export time data into QuickBooks).
- Enable the QuickBooks functionality by clicking on the “Enable QuickBooks” button on the left. The button is located by navigating to Options (⚙ icon) >> Integrations >> QuickBooks >> QuickBooks Desktop
- Open QuickBooks and go to File > Utilities > Export > Timer Lists
- Save the IIF file and open it in Excel or your favorite text editor
- Look for the value listed under COMPANYCREATETIME. It will appear at the end of the line beginning with TIMERHDR.
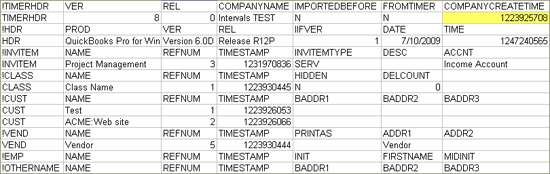
- Copy and paste the COMPANYCREATETIME into the “Company Create Time” value on the above left and click update
Notes:
- QuickBooks time export only works with the QuickBooks Windows edition.
- The COMPANYCREATETIME and COMPANYNAME variables must match exactly between QuickBooks and Intervals.
- Once you have enabled QuickBooks and entered the COMPANYCREATETIME value in the site settings section, the QuickBooks time export icon will appear on the above-mentioned pages with exportable time data.
- QuickBooks Mac does not allow time activity imports.
How does Intervals map exported time data to QuickBooks?
…and which fields are required?
It is essential that data between QuickBooks and Intervals matches, otherwise, QuickBooks will error out when trying to import the time data. For example, Quickbooks will give an error if a customer name you are trying to import matches a vendor name. The spelling and spacing of all items must match exactly for the fields in bold.
If there QuickBooks does not find a match, it will treat the data as a new client, project, etc without warning you. It’s difficult reverse the data once imported (i.e. all data entries must be deleted one by one) so it’s best to make sure the fields match beforehand
| Intervals | QuickBooks |
|---|---|
| Client | Client |
| Project | Job |
| Person | Employee |
| Worktype | Item |
| Category | Payroll Item |
| Task & Description | Note |
Support for mapping work types to QuickBooks sub items
Are you a QuickBooks power user? If so, we’ve updated the QuickBooks functionality for exporting time tracking data to IIF formatted files to support mapping work types to sub items. When creating your work types, use a colon to format the work type as an item/sub-item. For example, creating a work type labeled as “Web Design:HTML” will translate to QuickBooks with “Web Design” being the item and “HTML” being the sub-item. While this feature doesn’t add the ability to create sub work types, it does allow QuickBooks power users to take advantage of the items/sub-items feature within QuickBooks.
Importing Intervals time data into QuickBooks
After you have downloaded and saved an IIF file from Intervals, follow these instructions to import the file into QuickBooks.

- We strongly recommend backing up your QuickBooks data before doing your first import.
- Open QuickBooks and go to File -> Utilities -> Import -> Timer Activities
- Find the saved IIF file on your computer and select it for import.
- If QuickBooks warns you that the import file was created with an older version, click OK (Intervals can’t guess which version of QuickBooks you are running).
- A small timer window will open showing the results of the import. Click “View Report” to verify your time data was imported correctly.
- Close the status window and you are done!