Intervals is a robust task management platform with advanced time tracking features. It’s flexible and adaptable, which makes Intervals incredibly easy for teams to customize. Intervals is ideal for workflows that are similar to task management, such as bug tracking. In fact, many of Intervals’ task management features were influenced by some of our favorite bug tracking systems.
In this help article, we’ll explain why Intervals was built with an eye on bug tracking workflows. We’ll also explain how to configure your team’s account for managing bugs.
Why Intervals was built with bug tracking features
When we say that Intervals is a robust task management platform, what we really mean is that its features are more advanced than what teams will find in a typical task management platform. More than just a simple to-do list, Intervals enhances task workflows by adding task assignments, priorities, statuses, notes, and histories. This makes Intervals quite similar to what teams would expect from a dedicated bug tracking system.
We designed Intervals to adapt to the way software development teams work, not the other way around. This flexibility allows teams to use Intervals as a bug tracking system with just a few minor configuration changes to your account.
How to configure Intervals as a bug tracking system
To configure Intervals as a bug tracking system, you’ll need to make a few changes to your team’s account. Here are the steps to get you started:
Step 1:
Create bug types using categories

Intervals has a feature called categories, which are simply task categories. Create categories for the different types of bugs you’ll be fixing. For example, you might have categories for “UI Bugs,” “Backend Issues,” “Performance Problems,” and “Security Flaws.” This will help you organize bugs across all of your team’s projects, making it easier to filter and search for them. Properly categorizing your bugs will also enhance your reporting.
Default categories can be customized in the Settings & Defaults section of your account. This list will be available to all of your projects, allowing you to categorize your bugs as you assign them. And because they are an account-wide setting, bug categories make it possible to run reports across all of your projects, giving you a comprehensive view of your team’s bug tracking activity. For example, you can easily find out how many bugs were reported last month, or how many critical issues are unresolved.
Step 2:
Customize your bug tracking workflow with statuses
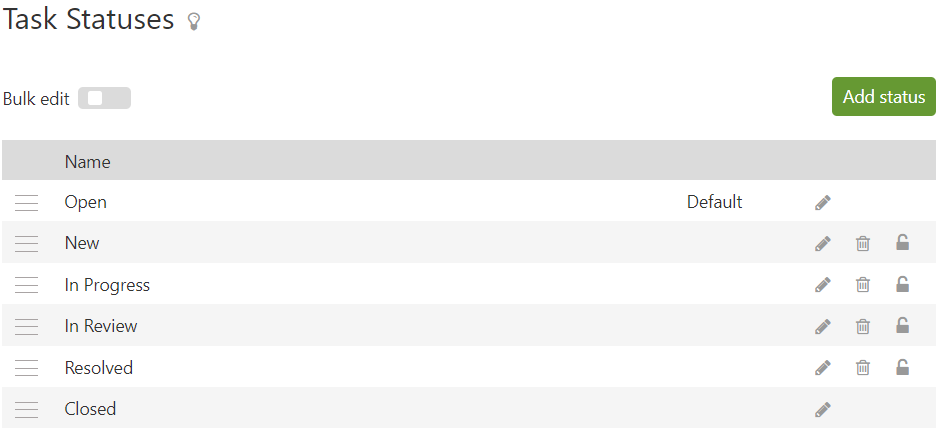
Task statuses are an important part of managing bugs because they allow you to customize your workflow. Customize your task statuses to reflect the different stages of a bug’s life cycle. For example, you might have statuses for “New,” “In Progress,” “In Review,” “Resolved,” and “Closed.” Statuses help everyone on your team understand the current state of a bug.
Task statuses can be customized in the Settings & Defaults section of your account. Create as many statuses as you need, and configure the order in which they appear by dragging them up and down the list. Intervals enables you to create the workflow that reflects the way you work.
Step 3:
Create a list of priorities
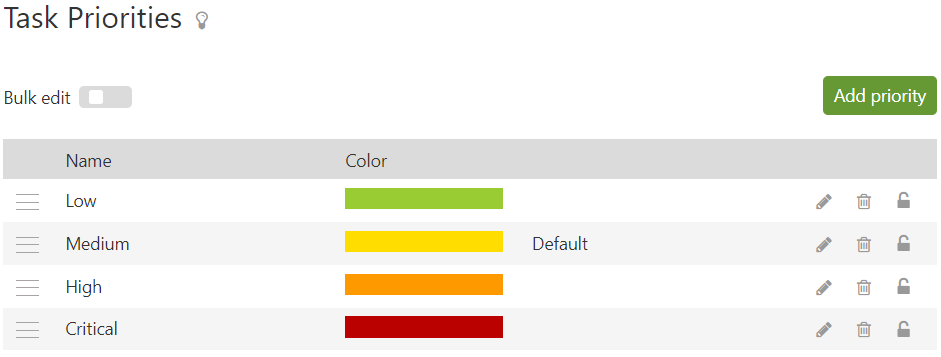
Task priorities are another important part of managing bugs, as they reflect the severity of each bug. The defaults that are preconfigured with every Intervals account are typically suitable for most use cases, but they can be customized if needed. In addition to having priorities for “Low,” “Medium,” and “High,” you can also create priorities to flag more severe bugs as “Critical” or “Showstopper.”
Task priorities can be customized in the Settings & Defaults section of your account. Create as many priorities as you need, and configure the order in which they appear by dragging them up and down the list. Each priority can also have a color assigned to it, which creates a visual indicator that intuitively communicates to your team the severity of each bug.
Step 4:
Create work types for tracking time
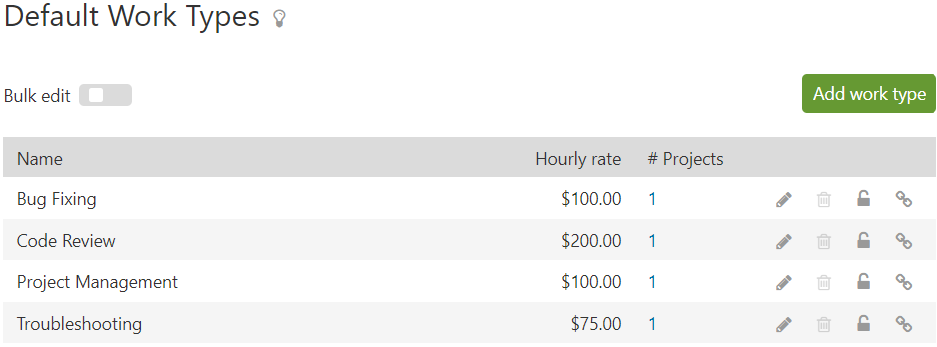
If you’ll be tracking time on your bugs to measure and analyze productivity, you’ll want to create a list of the different types of work you’ll be doing. For example, you might have work types for “Troubleshooting,” “Bug Fixing,” and “Code Review.”
Work types can be customized in the Settings & Defaults section of your account. Create as many work types as you need. This makes it easy to run reports to analyze your team’s productivity across all of the different types of bugs they’ve encountered. For example, you can analyze how much time your team spends troubleshooting bugs versus fixing them.
Step 5:
Create a project for each development effort
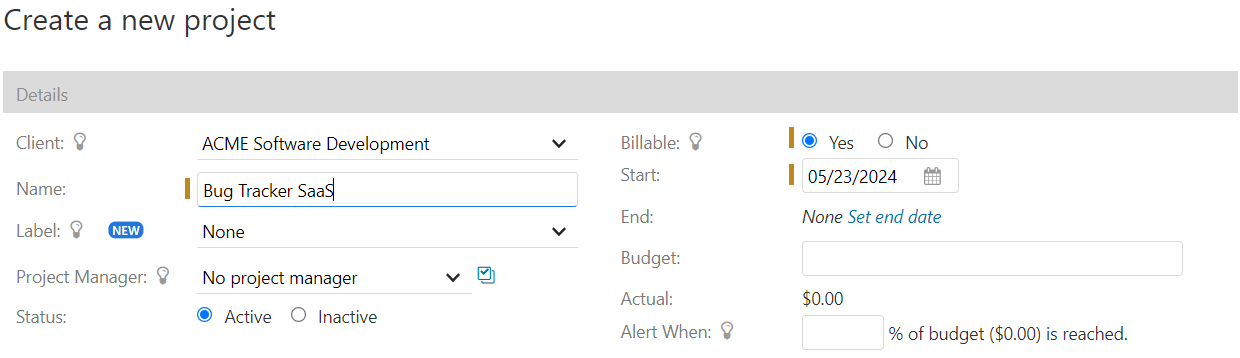
Intervals requires that all tasks be associated with a project. Create a project that will hold ongoing bugs for each development effort and name it something like “Bug Tracking,” “Development Issues,” or “QA.” This project will be used to keep all of your bugs organized and separate from other software projects.
To create a project, click on the “Projects” tab and then click on the “New Project” button. Enter the name and start date of the project, and then click on the “Save” button. You can also configure the project’s settings, such as the people who have access to it and the available work types and categories.
Step 6:
Document your first bug
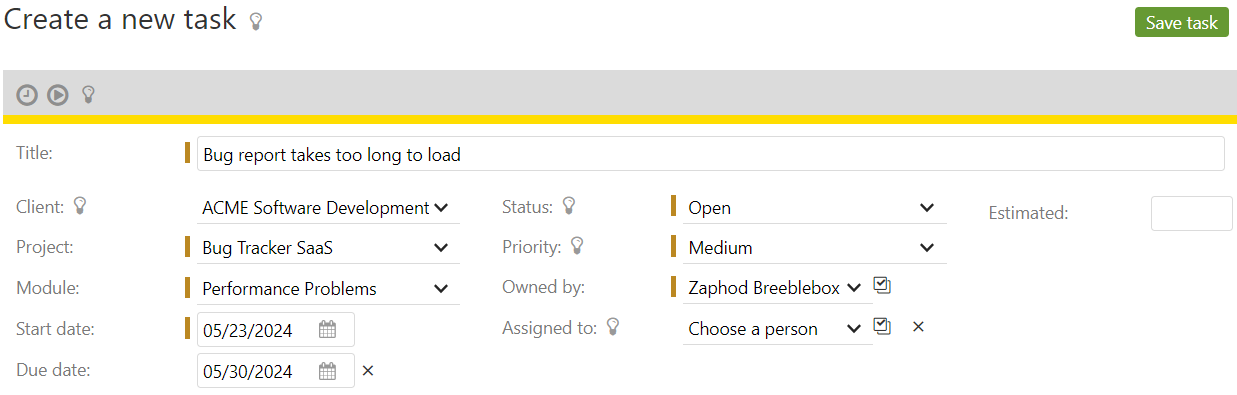
Now that you’ve configured your account for bug tracking, you’re ready to create your first bug. To create a bug, click on the “Tasks” tab and then click on the “New Task” button. Enter the name of the bug, assign it to a team member, set the priority, and choose the category. You can also add a description, attach files, and set the due date.
Once you’ve created the bug, you can track the time on it, add notes, and change the status as needed. The task listing will show you all of the bugs that are currently open, along with their status, priority, and due date. This makes it easy to see what needs to be done next, and to prioritize your work accordingly.
Advanced bug tracking system features
The steps above are enough to get you started using Intervals as a bug tracking system. However, there are a few more advanced features worth mentioning. These additional options will help make your bug tracking workflows and reporting efforts more efficient.
Document support
Document support is an advanced feature that allows you to attach files to each bug. This makes it easy to share information with your team that will help with troubleshooting and resolving the bug. Documents from all of your ongoing bug tracking can be accessed from the “Documents” tab, where Intervals will aggregate all of your files into one listing.
The request queue
The request queue is a feature that allows you to collect all of your team’s bug reports in one place. This makes it easy to manage your bugs, as you can quickly see what needs to be triaged. The request queue is available in the “Tasks” tab and can be accessed by clicking on the “Request Queue” link.
Your Intervals account includes an email address that is unique to your request queue. This email address can be used by your team to submit bug reports. Once a report is sent to the queue, it can quickly be assigned to a team member as a bug, then prioritized and scheduled for completion. One of the biggest benefits of creating bugs from the request queue is that it preserves the formatting of the original report, along with any attached documents, which will help the assignee troubleshoot and resolve the issue.
Reporting
Reporting can enhance the bug tracking experience, as it allows you to see how many bugs you’ve completed, how many are still open, and how much time you’ve spent on each one. Intervals includes a variety of reports that can help you analyze your bug fixing efforts, such as the “Task Snapshot Report” and the “Visual Dashboard.” These reports can be customized for deep dives into your data and can be exported to Excel for further analysis.
Summary
Intervals is a powerful and flexible platform that can be easily configured to manage the bug tracking process. By following the steps outlined in this help article, you can configure your account to manage bugs and take advantage of its robust features to enhance your software development workflow.
If you have any questions about using Intervals as a bug tracking system, please don’t hesitate to contact our support team and ask for a demo. We’re here to help you find out if Intervals is the right fit for you.